Before You Start
As with most projects a little preparation can make life a lot easier. Most of what follows falls into the category of the blindingly obvious but it's still worth stating:-
- Batteries - Time lapse photography involves taking literally hundreds of photographs over an extended period of time. Make sure your camera and intervalometer batteries are fully charged and take spares for both if you have them.
- Memory Cards - These are much cheaper nowadays so get the best you can afford. Bear in mind that you should be shooting RAW and that as a result your file sizes will be huge. Also remember that you may be shooting hundreds of shots at very short intervals and that you need a card with a good write speed. A 32Gb, Class 10 card with a 45Mb/s is a good starting point. You can get cards of this specification on the internet for around £15-£20.
- Clothing - Time lapse photography involves a lot of standing around. If we assume a final video frame rate of 30 frames per second then a 10 second video will require 300 shots. If you have programmed your intervalometer to fire the shutter every 5 seconds then those 300 shots will take 25 minutes to complete. You probably won't want to leave your camera unattended for that length of time so you are likely to be standing around waiting. Make sure you are wearing clothing that will keep you comfortable as you wait on the sequence being completed.
- The Weather - Be aware of how the weather will impact upon your shooting. Is it likely to start raining before your shooting sequence has finished? Is it so windy your camera, despite being on a tripod, is likely to be buffeted? Some time lapse sequences, such as star trails can take hours to complete. Think about how the weather is likely to change during that period. Clear winter skies can make for wonderful time lapses but you run the risk of frost forming on your lens and so ruining your attempt. Just pause for a moment, before you start and consider if there is anything else you can do to prevent the weather from affecting your work. Sometimes all it takes is a waterproof cover for your camera or a bit of added weight for your tripod. On this last point many tripods have a hook at the bottom of the central pillar. Just hanging your camera bag from it can be enough to keep it steady on a windy day.
- Photographic Composition - Just because the emphasis here is on producing time lapses it doesn't mean the normal considerations concerning photographic composition can be ignored. OK, you want to capture movement but the viewing experience will be heightened if the composition of the scene as a whole is pleasing. Apply the usual "rules". Consider including some foreground interest and remember to consider lead in lines. Be aware, however, that too much foreground movement of, vegetation for example, can be distracting in a time lapse. Finally, remember the Rule of Thirds and you will not go too far wrong.
- Wear & Tear on Your Camera - Camera components are subject to wear and tear just like any other mechanical device. Doing time lapse photography will significantly increase your camera's shutter count. Whilst many manufacturers test their shutters to operate in excess of 150,000 times you should be aware that doing a lot of time lapse sequences may have an impact upon your camera's working life.
- Computer File Structure - You need some way of keeping your photographs in order as you proceed through the workflow. Set up a file structure in advance so that you are ready to go as soon as you have finished taking the shots. The structure illustrated below works for me. It means that if something goes wrong I have my files arranged in an order that allows me to re-start at the point just before where the problem arose rather than going right back to the beginning. As the process of producing a time lapse video can take around 2-3 hours to complete you don't want to have to re-start too often. A brief explanation of what each stage is for is given below:-
|
Stage 1 - the location where the original raw images are imported and stored Stage 2 - where I keep my converted jpegs Stage 3 - used to keep the de-flickered jpegs Stage 4 - location for the final images used to produce the video |
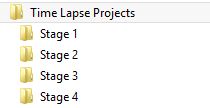
Suggested File Structure
|
Camera Settings
How you set your camera up will have a significant bearing on the success, or otherwise, of your time lapse videos. There are a number of things to bear in mind.
- Use a tripod - The camera must be held absolutely still for the full duration of shooting. Using a tripod is the best way to ensure this happens. If it's windy and/or your tripod is a lightweight version consider weighing it down to further reduce any possibility of movement - see above.
- Compose your image - See above.
- Position your intervalometer - You don't want it to be flapping around in a breeze possibly causing your camera/tripod to move. Depending upon the length of cable either lay it on the ground or secure it to your tripod with an elastic band.
- Set your intervalometer - This involves deciding how many shots to take and at what interval. Much of this will depend upon what your subject matter and how long you wish the final video to be. On this latter point the generally held view is that individual time lapse clips should last somewhere between 8 and 15 seconds. Let us assume a 10 second duration for our time lapse video. If the final video frame rate is, for example, 30 fps and the shooting interval is 3 seconds then we can calculate how long the shoot will take, as follows:- 10 X 30 X 3 = 900 seconds. Divide that by 60 and you have an overall shooting time of 15 minutes. In terms of the shooting interval the more and quicker the movement in the scene the shorter the interval should be. So a fast moving scene involving say, moving traffic in daytime should have a shooting interval of 1-2 seconds. A flower opening, on the other hand, may require a shooting interval of 2-3 minutes and a long term construction project, an interval of 5-10 minutes. Bear in mind also the capabilities of your camera and memory card. Not all are equipped to write at the speed needed and so may buffer. This can cause the camera to fail to fire the shutter at the correct interval as it is still trying to write the data from the previous shot by the time the next one is due to be taken. This is known as "dropping a frame". It causes stuttering in the final video and makes for unpleasant viewing. Finally, don't fall into the trap of setting a shutter speed that is longer than your shooting interval, i.e. a star trail time lapse where you set your camera to take a 30 second exposure every 20 seconds - it just won't work.
- Shoot Raw - Do this for the simple reason that you retain all the pixel data and so have more of it to work with when processing your images. Also, Panolapse is designed to work with raw files. Be aware, however, that your file sizes will be huge and that the various processing stages in the workflow that use raw files may take some considerable time.
- Shoot in full manual mode - You want to be in control of all your camera's settings. By allowing the camera to decide such things as focus, white balance, ISO, aperture and shutter speed you significantly increase the chances of flicker or changes in depth of field, so....
- Select your ISO (sensor sensitivity) - Do not use Auto ISO. You do not want you camera to be changing its settings in the middle of a shoot if the lighting conditions change. This could result in the camera creating images of differing brightness which would exacerbate the problem of flicker. The conventional wisdom for time lapse photography is to choose your camera's lowest ISO setting.
- Select your White Balance Setting - Do not use Auto White Balance. It is highly possible that the lighting conditions may change during the shooting period. In such circumstances your camera may adjust its WB settings creating images with different white balances. Once more, this causes problems with flicker in the final video.
- Select your Aperture and Shutter speed - Meter the scene and select values to generate a correctly exposed image. Don't worry about lighting changes during the shooting as Panolapse will smooth these out for you. Bear in mind, however, that in time lapse photography a little motion blur can actually enhance the look of the final video. Chose a combination of aperture and shutter speed that give you the correct compromise between the depth of field you want and achieving a little motion blur. This is not always easy to achieve, especially in full daylight, so consider using a neutral density filter as a way of reducing the amount of light entering your lens.
- Focus Manually - Once more you need to be in control here. You do not want your camera's autofocus to be hunting constantly for focus in an ever changing scene. With your camera initially set on autofocus choose your focus point. Half depress the shutter to achieve focus and then switch your camera to manual focus thus locking it at a fixed focal length.